Last week we introduced you to everything you need to know before you hit the gym. This week, we’re helping you figure out what to actually do when you GET there!
Some gyms offer free programs when you get started, and they can be a great way to build your confidence in a gym setting. But when it’s time to spread your wings and design your own gym program, you’ll want to keep these 5 basic principles in mind.
Join us as we guide you to designing a whole-body strength training program!
Principal 1. Decide on your workout goals.
If you really want to get the most out of your time at the gym, it pays to make sure that your program is actually targeting the right thing! For different goals, we can use different repetition ranges, sets, and load (intensity) to train the different functions of the muscles (check out last week’s blog if you’re not quite sure what these words mean!).
Do you want to…
Build strength or muscular endurance? Become more powerful? Gain muscle mass? Lose weight? Get fitter? Are you training for an event or specific type of sport?
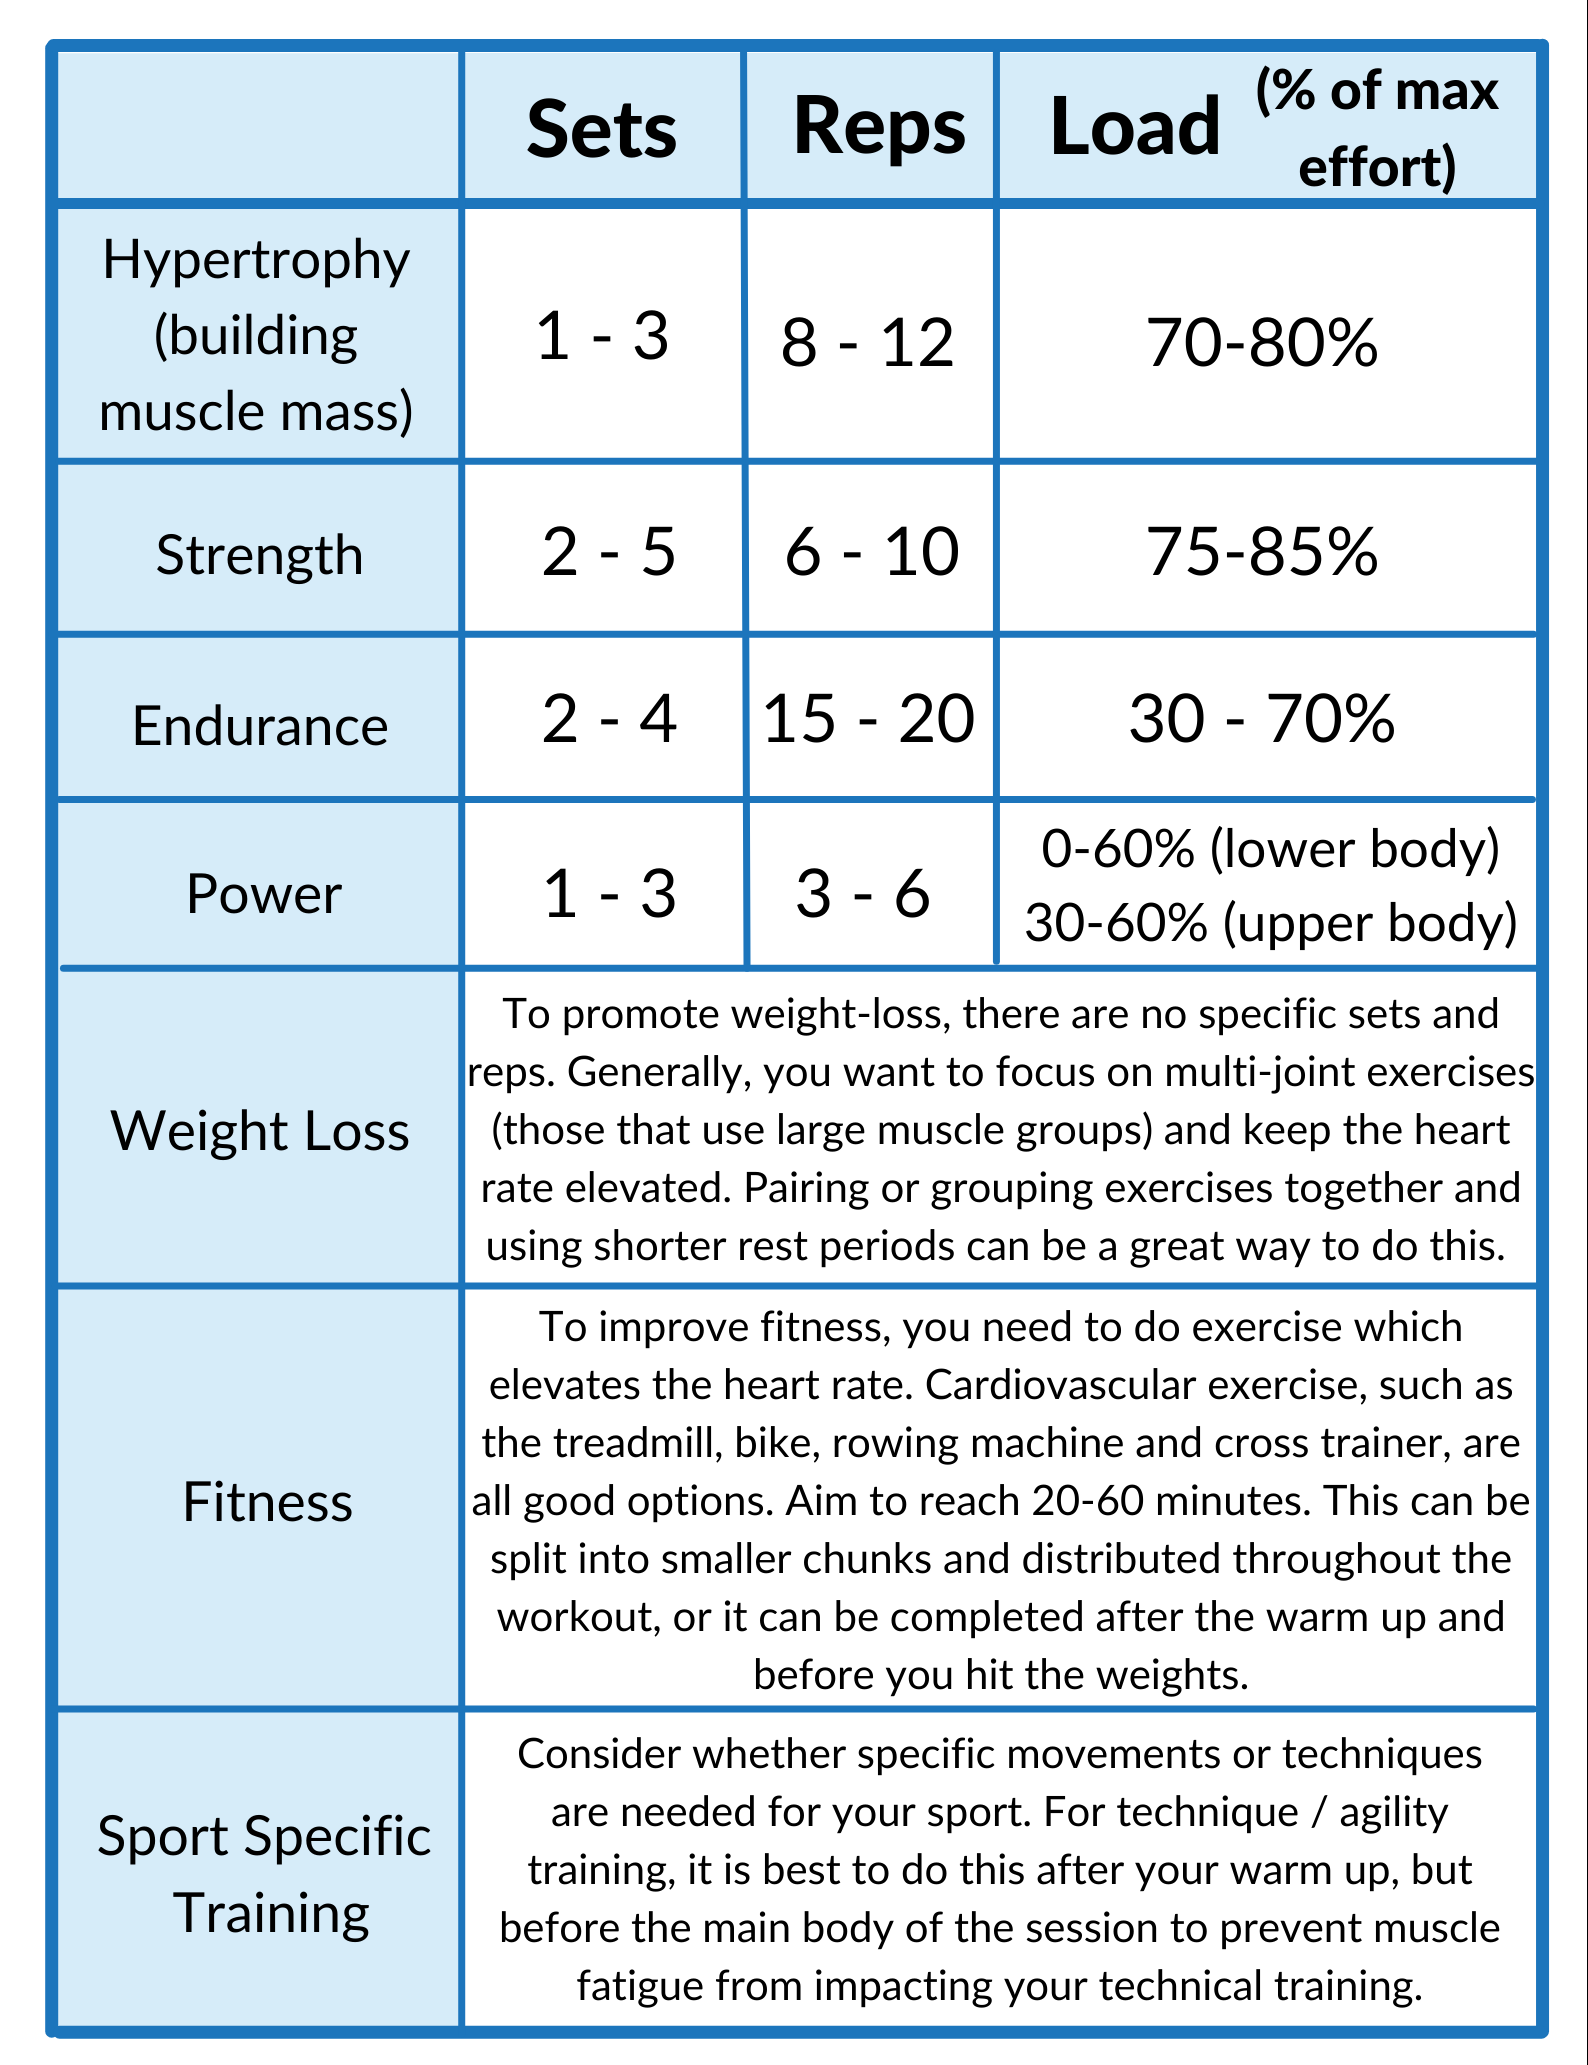
Check out our handy table to determine what type of program design is right for you.
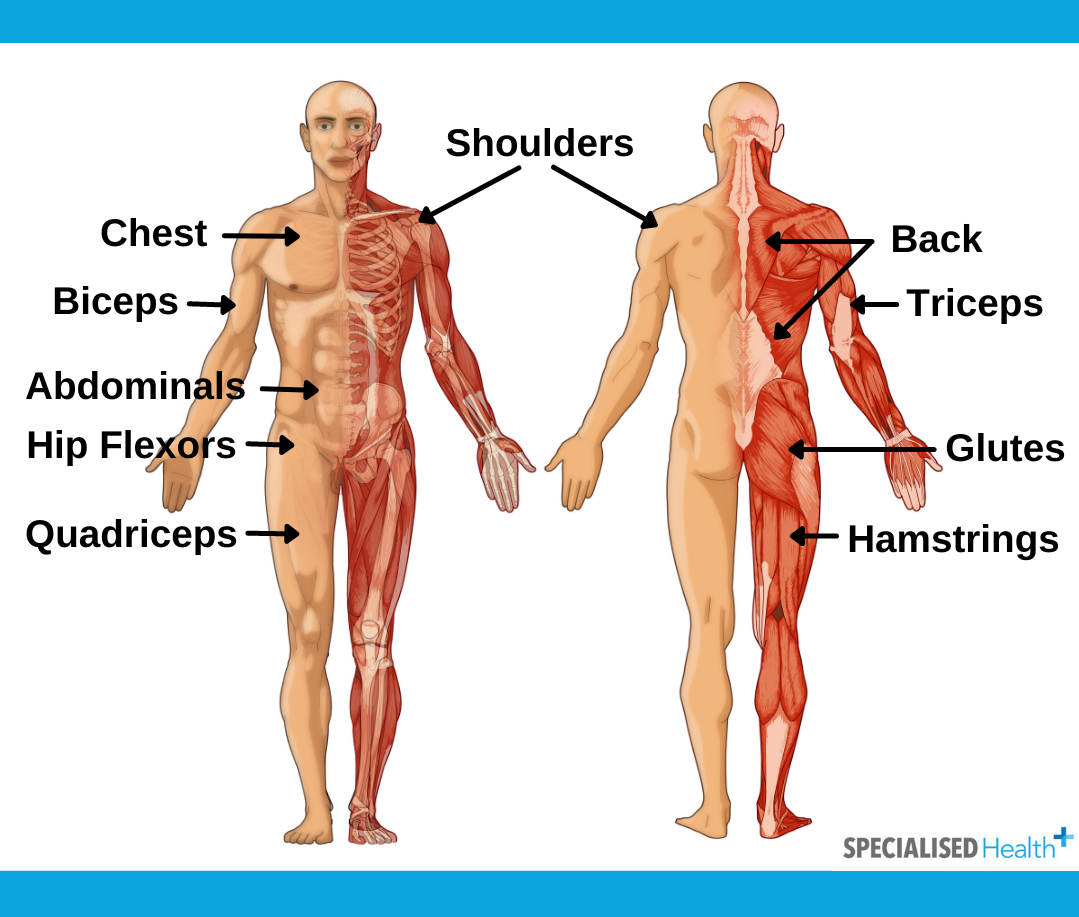
Principle 2. Create a well-balanced routine by including exercises for all of the major muscle groups.
You can use websites such as ACEFitness or ExRx for ideas of different exercises that use each of these muscle groups.
When designing a well-balanced gym program, we want to make sure that we are ticking off the opposing muscle groups to prevent muscle imbalances. Opposing muscle groups are muscles on opposite sides of a joint that have the opposite action – for example, the hamstring muscle bends the knee, and the quadriceps muscle straightens it. Muscle imbalances become problematic when one side of the joint becomes significantly stronger than the other side, which can impact the function of the joint and in some cases even pull the joint out of alignment! If you’re training one side of a joint, you want to be training the other side too!
Other examples of opposing muscle groups are:
- Chest / Back
- Biceps / Triceps
- Hip Flexors / Glutes
Principle 3. Start with machine weights, then progress to free weight exercises.
Machines have the advantage of helping to keep the weight on the correct trajectory during the exercise. Start with machine weights until you get the hang of it, then give the free weights (dumbbells, kettlebells) a go. Free weights require you to create stability at the joint – this means that the muscles need to work harder to maintain good control of the weight. By establishing a strong base first, you help to prepare the joint for creating stability for free weights.
Note that bodyweight exercises and resistance bands are also a good place to start for building a strong base before you bring the weights in.
Principle 4. Push yourself to fatigue, not failure.
When we say “fatigue, not failure”, this means that you should be able to complete the last repetition of the exercise in your set with the appropriate technique, but feel muscle fatigue. If the weights are too heavy, your exercise technique will start to falter, or you simply won’t be able to complete the last few repetitions. If the weights are too light, you’ll get to the end of the set and feel like you could keep going. You should feel like you have done all you can, or maybe only one or two more repetitions left in the tank, without any changes to the correct technique.
Note: When determining how heavy the weights should be for each exercise, use the ‘fatigue, not failure’ rule alongside the specific set/rep ranges for your goals. Check out the handy table in Principle 1. If your goal involves a higher number of repetitions, the weight will be lower to allow you to carry out the greater number. For fewer repetitions, the weight will be higher.
Principle 5. Allow rest periods between exercises that use the same muscle groups.
Short rest periods (30-60 seconds) between the sets give your muscles the chance to get rid of the waste products and refuel their energy supply, meaning that you’ll get more out of your training session. If you don’t want to rest between exercises or are on a tight time frame, it can be helpful to ‘superset’ (couple) 2 different exercises together, or create a mini circuit to repeat for your desired number of sets. You may wish to design your program so that any exercises that work the same muscle groups (i.e. lunges and squats) are separated by other exercises so that you can accumulate more rest time before using that same muscle group again.
Ready to design your own gym program? Use the 5 principles above to guide your program design!
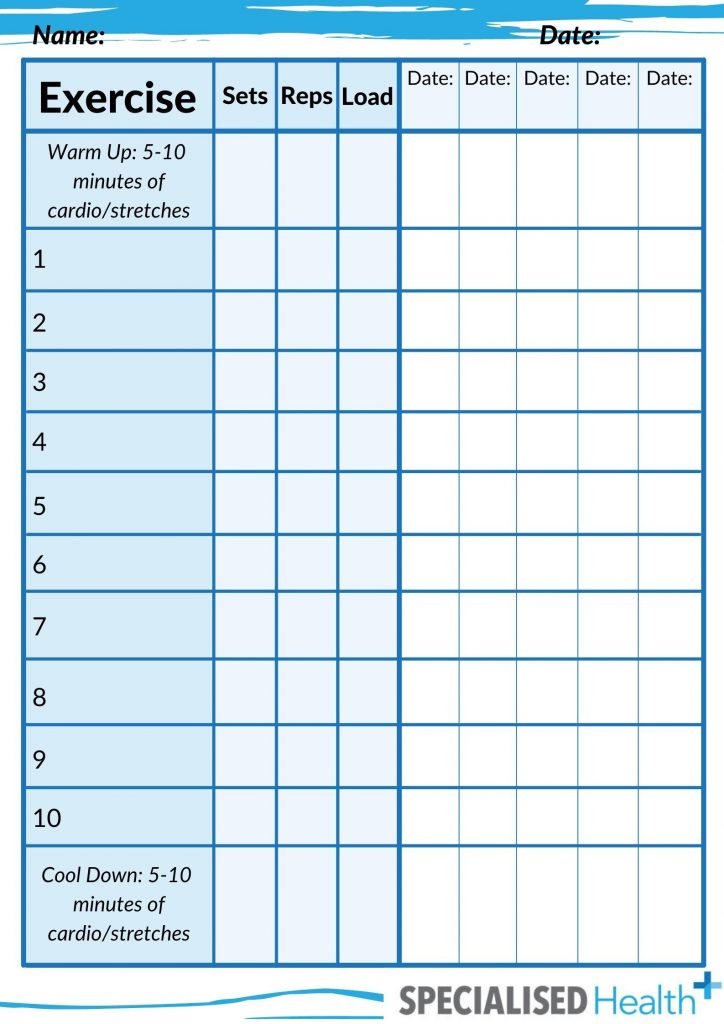
Print this image and fill in the blanks!
One final tip:
If you really want to get those gym gains, you need to be kind to your body! Rest days between workouts are important to allow your muscles time to recover and repair themselves.
Ideally, we don’t want to be working out the same muscle groups within 48 hours of each other (2 days). You can either schedule your gym sessions for every second day, or if you’re keen to hit the gym on consecutive days, you can split your program up into 2 programs (i.e. upper body / lower body) and alternate between programs. That way, you’re still getting that much-needed recovery time!
How did you go?
Send us through your program design and one of our superstar EP’s can take a look at it for you!
Author: Yolanda van Vugt
Editor: Tessa Nielsen
Clinical Exercise Physiologist and Content Creators at Specialised Health
Let’s connect, find us:
![]()
![]()
![]()
Have you got a claimant that would benefit from E.P. support? Refer to the team!
#exercisephysiology #exerciserehab #rehabilitation #lifeinsurance #incomeprotection #ctp #workcover #mobile #telehealth #telehealthprogram #mobileexercisephysiology #returntowork #fatigue #mentalhealth #cancer #musculoskeletal #pain #physio #physiotherapy #Sydney #Brisbane #Melbourne #Adelaide #Auckland #Waikato #BayofPlenty #Wellington #Otago #Christchurch